The raduino
board behind the display houses an Arduino nano, to fit a nextion screen to your
Ubitx board you need to flash a newer firmware to the Arduino!
If your
screen allows you to select a com port and set it to nano 328p like and the
baud rate, like in the picture below ignore the ch340 and the Arduino IDE steps
and scroll down to the Xloader section.
I found some issues with this so I thought I would
share my findings for others that have never worked with the Arduino microcontrollers
before, this is updating the Arduino are two diffrent parts that make the nextion
screen work
Skills needed:
soldering
Ok before I
start I recommend you buy an Arduino nano328p as they unplug from the board (I recommend buying
without the header pins fitted as header pins are fitted to the top of the
board), you can find these on amazon and ebay for less than £5. and the origonal nano is there and working should you need to go back to the lcd screen for any reason.
Tools
needed:
soldering iron
mini usb lead (not a micro usb)
tools to get to your raduino board if fitted into a case
Software needed:
ch340 driver Here
Arduino IDE here
Xloader here (auters websire not available)
The Driver:
Ok install
the ch340 driver is needed for most of the Arduino Nano boards as they are
clones and use this driver board. Sometimes this fails to install properly on winnows
10 it informs you of this, restart the installer and click uninstall, once
uninstalled click install and it should work.
Arduino IDE:
I did this
as im not sure why but I could not get xloader to flash the firmware across to
the board until I uploaded a program through the IDE for some reason!
ok on the
site there are many ways to use it from a web interface to a windows app or
download it and install to the computer. I have tried the app but some of the
projects I have made have had issues with flashing the firmware to the boards
for some reason. So I downloaded the IDE and installed manually.
If you don’t
use official Arduino boards for your projects I recommend making a donation to
them for all their hard efforts making the software so you can work with these
boards.#
Ok once
installed restart your computer.
When its
restarted plug the Arduino into the computer, the computer should make a noise
saying its recognized it’s been plugged in and the power light should come on
and the nano
Now start
the Arduino ide.
Click on
file on the top menu then go down to examples > basics>blink, the blink
text should show in the main editor box.
Then click
on tools in the top menu scroll down to Board then a side menu comes out and
find nano.
Then in
tools scroll down to processor and select the atmega328p (old version) I believe
the new version is only on the newer official nano boards)
Also in
tools check the port no is correct for the board its easier if there are no
other usb connected to the computer at the time
Then below
the file menu there are some icons, click on the right arrow next to the tick
(should say upload) this will send the blink file to the Arduino details as it goes
information will come up in the bottom of the ide and a progress bar will tell
you what’s going on.
If you look
at the four led lights by the reset button on the board the tx and rx leds will
flicker very quickly when it says uploading in the ide at the bottom once done
it will tell you what its done and if it was successful
Ok if that
works without fault leave the board connected and open xloader
Xloader:
Ok sometimes
its as easy to set up xloader you open it and it it works straight off, if
your reading this you may be having a bit of fun getting to this point
I downloaded
the nano firmware from HAMSKEY and unpacked it, there are two files one for the
v2,3,4 boards and one for the v5 board open the correct file to your version Ubitx
board and open the read me file and it tells you what file you need for your UbitX.
In x loader
The top
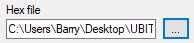
line hex file is the file you want to flash to the nano click on the square
with the dots to find your hex file and the path for that file once you open it
comes up in the white box
Use the
drop down menu and select duemilanove/nano (atmega328)
Com port
needs to be the port of your nano, the same as you used in the IDE
Baud rate
should set when you choose the device but don’t use any more than 57600
Press upload
and it should come up with whats happening in the very bottom of program, it
should take less than 30 seconds from pressing the upload button, again tou
will see the tx and rx lights flash on the board and when they stop the program
will confirm if its worked or not.
This nano
is ready to swap out with the other nano on the raduino
NOTE: the
Nextion screen wont work until you upload the files to the nextion screen, that
will be done once I receive my screen